Graphical User Interface (GUI) programming is supported by the Abstract Window Toolkit (AWT). Java AWT components are platform-dependent, which means they are shown in accordance with the operating system’s view. AWT is heavyweight, which means that its components consume the resources of the underlying operating system (OS). This illustrates how Abstract Window Toolkit applications are platform-dependent.
Swing is an upgraded GUI API that extends AWT, which is the foundation upon which Swing is built. However, AWT is no longer used because most GUI Java projects are written using Swing due to its comprehensive GUI control implementation and lightweight nature.
AWT features:
AWT features include:
- A set of native user interface components
- A robust event-handling model
- Graphics and imaging tools, including shape, color, and font classes
- Layout managers, for flexible window layouts that do not depend on a particular window size or screen resolution
- Data transfer classes, for cut-and-paste through the native platform clipboard
AWT Components And Hierarchy:
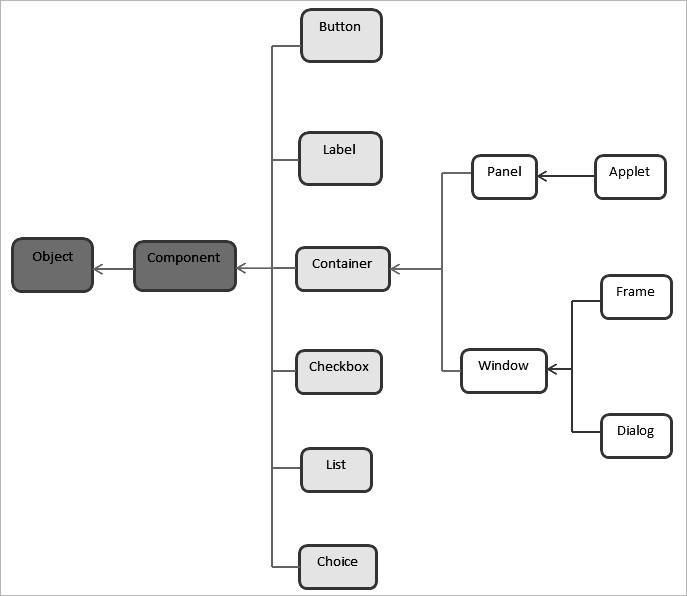
Components:
Components are all the elements such as buttons, text fields, scroll bars, and so on. As illustrated in the picture above, there are classes for each component in Java AWT. To arrange each component in a certain location on a screen, we must first add them to a container.
Container:
The Container is an AWT component that can hold other components such as buttons, text fields, labels, and so on. Containers are classes that extend the Container class, such as Frame, Dialog, and Panel.
Panel:
The panel is a subclass of the Container class. A panel is a concrete class that lacks a title, border, and menu bar. It serves as a container for the other components. A frame may contain more than one panel.
Window class:
Windows class is a window at the top level, and we can use frames or dialogs to create a window. A window does not have borders or menu bars.
Frame:
The Frame is the container for the title bar, border, and menu bars. Other components like a button, text field, scrollbar, and so on can be added. When designing an AWT application, the most commonly used container is the frame. Frame class has two different constructors,
Frame() throws HeadlessException
Frame(String title) throws HeadlessException
A frame can be created in two ways:
- By using the Frame class object
import java.awt.*;
    class FrameButton{
        FrameButton (){
            Frame f=new Frame();
            Button b=new Button("CLICK_ME");
            b.setBounds(30,50,80,30);
            f.add(b);
            f.setSize(300,300);
            f.setLayout(null);
        f.setVisible(true);
    }
    public static void main(String args[]){
        FrameButton f=new FrameButton ();
    }
}
Output:

- By Extending the Frame class
import java.awt.*;
class AWTButton extends Frame{
    AWTButton (){
    Button b=new Button("AWTButton");
    b.setBounds(30,100,80,30);// setting button position
    add(b);//adding button into frame
    setSize(300,300);//frame size 300 width and 300 height
    setLayout(null);//no layout manager
    setVisible(true);//now frame will be visible, by default not visible
}
    public static void main(String args[]){
        AWTButton f=new AWTButton ();
    }
}
Output:

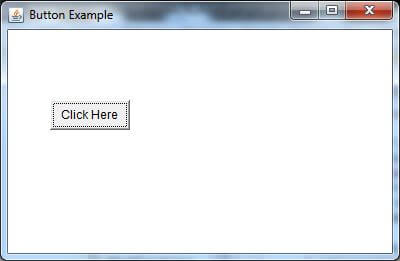
Java AWT Button:
When pressed, a button is essentially a control component with a label that causes an event. The Button class is used to construct a labeled button with platform independence. When the button is pressed, the application performs some action.
Example:
import java.awt.*;
public class ButtonExample {
public static void main (String[] args) {
    // create instance of frame with the label
    Frame f = new Frame("Button Example");
    // create instance of button with label
    Button b = new Button("Click Here");
    // set the position for the button in frame
    b.setBounds(50,100,80,30);
     // add button to the frame
    f.add(b);
    // set size, layout and visibility of frame
    f.setSize(400,400);
    f.setLayout(null);
    f.setVisible(true);
}
}
Output:
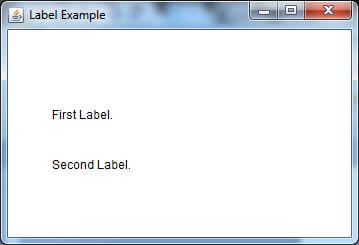
Java AWT Label:
The Label class object is a component for inserting text in a container. It displays a single line of read-only text. A coder can update the text, but a user cannot directly edit it.
import java.awt.*;

public class LabelExample {
public static void main(String args[]){

    // creating the object of Frame class and Label class
    Frame f = new Frame ("Label example");
    Label l1, l2;

    // initializing the labels
    l1 = new Label ("First Label.");
    l2 = new Label ("Second Label.");

    // set the location of label
    l1.setBounds(50, 100, 100, 30);
    l2.setBounds(50, 150, 100, 30);

    // adding labels to the frame
    f.add(l1);
    f.add(l2);

    // setting size, layout and visibility of frame
    f.setSize(400,400);
    f.setLayout(null);
    f.setVisible(true);
}
}
Output:
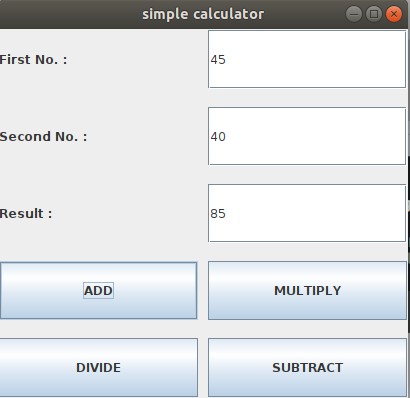
Java AWT TextField:
A TextField class object is a text component that allows a user to enter and change a single line of text. It derives from the TextComponent class, which derives from the Component class.
Let us see an example of a calculator using Window Builder in Eclipse IDE.
Action Listener for Addition:
package gui1;

import java.awt.event.ActionEvent;
import java.awt.event.ActionListener;
import javax.swing.JTextField;

public class Addition implements ActionListener {
private JTextField ta,ts,tr;

    public void actionPerformed(ActionEvent e)
    {
    	String fn= ta.getText();
    	String sn= ts.getText();
    	int a =Integer.parseInt(fn);
    	int b =Integer.parseInt(sn);
            int c=a+b;
            String res=Integer.toString(c);
    		tr.setText(res);


    }
	public Addition(JTextField ta,JTextField ts ,JTextField tr)
	{
		this.ta=ta;
		this.ts=ts;
		this.tr=tr;

	}
}
Action Listener for Subtraction:
package gui1;

import java.awt.event.ActionEvent;
import java.awt.event.ActionListener;
import javax.swing.JTextField;

public class Subtraction implements ActionListener {
private JTextField ta,ts,tr;

    public void actionPerformed(ActionEvent e)
    {
    	String fn= ta.getText();
    	String sn= ts.getText();
    	int a =Integer.parseInt(fn);
    	int b =Integer.parseInt(sn);
            int c=a-b;
            String res=Integer.toString(c);
    		tr.setText(res);


    }
	public Subtraction(JTextField ta,JTextField ts ,JTextField tr)
	{
		this.ta=ta;
		this.ts=ts;
		this.tr=tr;

	}
}
Action Listener for Multiplication:
package gui1;

import java.awt.event.ActionEvent;
import java.awt.event.ActionListener;

import javax.swing.JTextField;

public class Multiplication implements ActionListener {
private JTextField ta,ts,tr;

    public void actionPerformed(ActionEvent e)
    {
    	String fn= ta.getText();
    	String sn= ts.getText();
    	int a =Integer.parseInt(fn);
    	int b =Integer.parseInt(sn);
            int c=a*b;
            String res=Integer.toString(c);
    		tr.setText(res);


    }
	public Multiplication(JTextField ta,JTextField ts ,JTextField tr)
	{
		this.ta=ta;
		this.ts=ts;
		this.tr=tr;

	}
}
Action Listener for Division:
package gui1;

import java.awt.event.ActionEvent;
import java.awt.event.ActionListener;
import javax.swing.JTextField;

public class Division implements ActionListener {
private JTextField ta,ts,tr;

    public void actionPerformed(ActionEvent e)
    {
    	String fn= ta.getText();
    	String sn= ts.getText();
    	int a =Integer.parseInt(fn);
    	int b =Integer.parseInt(sn);
            int c=a/b;
            String res=Integer.toString(c);
    		tr.setText(res);


    }
	public Division(JTextField ta,JTextField ts ,JTextField tr)
	{
		this.ta=ta;
		this.ts=ts;
		this.tr=tr;

	}
}
Calculator.java
Here, we have created a calculator incorporating all the action listeners for the buttons using Java Swing GUI Framework.
package gui1;

import java.awt.GridLayout;

//import javax.swing.JButton;
//import javax.swing.JLabel;
//import javax.swing.JTextField;
import javax.swing.*;
public class calculater extends JFrame{
	 private static final long serialVersionUID = 1L;
		private JLabel lblFirst_No,lblSecond_No,lblResult;
		private JTextField jtFirst_No,jtSecond_No,jtResult;
		private JButton btnAdd,btnMultiply,btnDivide,btnSubtract;

		public calculater()
		{ setTitle("simple calculator");
		lblFirst_No=new JLabel("First No. :");
		lblSecond_No = new JLabel("Second No. :");
			lblResult=new JLabel("Result :");
		jtFirst_No=new JTextField(5);
		jtSecond_No=new JTextField(5);
		jtResult=new JTextField(5);
			btnAdd=new JButton("ADD");
			btnMultiply=new JButton("MULTIPLY");
			btnDivide=new JButton("DIVIDE");
			btnSubtract=new JButton("SUBTRACT");
			GridLayout g1=new GridLayout(5,2,10,18);
			//FlowLayout f1=new FlowLayout();
			setLayout(g1);
			add(lblFirst_No);
			add(jtFirst_No);
			add(lblSecond_No);
			add(jtSecond_No);
			add(lblResult);
			add(jtResult);
			add(btnAdd);
			add(btnMultiply);
			add(btnDivide);
			add(btnSubtract);
			Addition lh= new Addition(jtFirst_No,jtSecond_No,jtResult);
			btnAdd.addActionListener(lh);
			Multiplication ml=new Multiplication(jtFirst_No,jtSecond_No,jtResult);
			btnMultiply.addActionListener(ml);
			Subtraction s1=new Subtraction(jtFirst_No,jtSecond_No,jtResult);
			btnSubtract.addActionListener(s1);
			Division d1=new Division(jtFirst_No,jtSecond_No,jtResult);
			btnDivide.addActionListener(d1);
		}

		public static void main(String[] args) {
			// TODO Auto-generated method stub
	      calculater ob =new calculater();
	      ob.setSize(300, 400);
	      ob.setVisible(true);
		}

}
Output:
Note: also read about the JApplet class in Applet
Follow Me
If you like my post, please follow me to read my latest post on programming and technology.
https://www.instagram.com/coderz.py/
https://www.facebook.com/coderz.py
Staying up to the mark is what defines me. Hi all! I’m Rabecca Fatima a keen learner, great enthusiast, ready to take new challenges as stepping stones towards flying colors.
Leave a Comment
You must be logged in to post a comment.